Disclaimer: There is no warranty or assuredness that the text provided is accurate, so you must try at our own personal risk. Know that you could screw your camera up if you are not careful and the risk is only yours to take. If you don’t want to take the risk, send the camera in to Pentax for servicing. It’s that simple!
Now with the Myth Busters-esque disclaimer out of the way…
I recently took the K10D w/ FA 50mm f1.4 to a park around sunset after a meeting with my friend. I was planning on using the images for a review of the FA 50mm f1.4 lens. Upon skimming through the resulting photos such as the one below:

My thoughts from this previous post I had made about an auto focus anomaly the K10D had with the DA 14mm f2.8 were confirmed. My most used shooting style is to be in selectable point auto focus mode with a gravitation toward the 4 “rule of thirds” points. I had noticed in those images that the subject I had intended to be in focus was not. What was in focus was behind them, so it was obvious the camera was back focusing. Due to the level of back focus shift going on I felt it is necessary to correct the issue.
To make absolutely certain, I mounted the FA 50mm and DA 40mm Limited on a tripod at home and started taking a few photos of a ruler at around a 45 degree angle with maximum aperture to produce a good small slice of discernible sharpness I could analyze. I tried both lenses with every single focus point, which wasn’t really necessary in retrospect.
Here are the results at center point (the seven should be the point of focus):
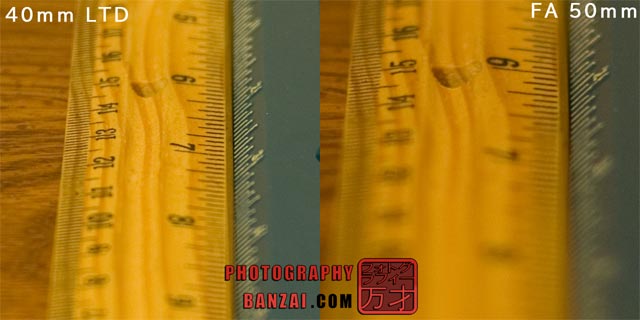
The “7” should be the sharpest part of the image with around an equal amount of tapering off sharpness above and below, so I was able to tell that both lenses are suffering from back-focus. The FA 50mm f1.4 appears to suffer more, but that is just due to lens focal length and the wider aperture. With f1.4 at 50mm, there is a lot less depth to discernible sharpness.
I went about figuring out how to best solve the issue. Quite a few Google searches later resulted in these sites:
The excellent post by the “Photography Rulez” blog
The Pentax Hack website Debug menu info
A a few PentaxForums (just do a search…) postings with old methods and new ones on the subject.
The first two websites were golden as they say…
Here is my focus correction lab setup:
– K10D camera body with firmware v1.31, which is the newest available at the moment.
– Two SD cards.
– Various camera lenses.
– Those two excellent websites as reference.
– Tripod, desk, and a ruler or two. Although I would suggest printing out a focus chart to use instead of the ruler.
Here is the process I followed:
Setup the tripod and ruler or focus chart, with the camera around 45 degrees above the subject.
You will need two SD cards. Make sure they are empty, and as a further step just have the camera format them (probably not necessary).
– SD Card 1: Add a text file to the root directory called MODSET.TXT exactly. Inside the text file place [OPEN_DEBUG_MENU], or optionally you can directly use the codes [DEBUG_MODE EN] (enable debug mode) and [DEBUG_MODE DIS] for use after (disable debug mode after you are done…).
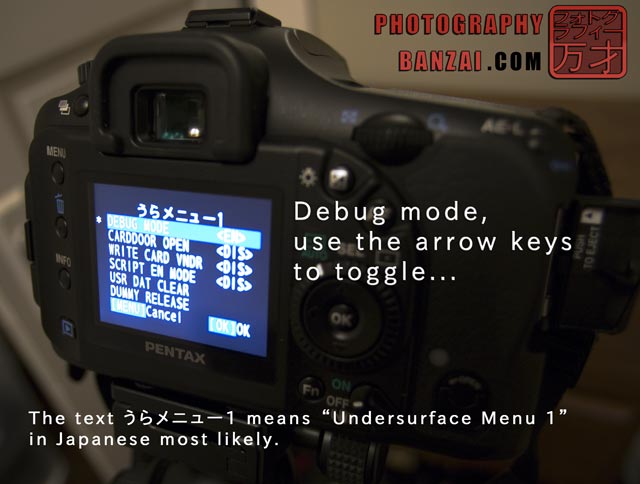
Well anyways I just used [OPEN_DEBUG_MENU] because it has a menu option to enable and disable debug mode, allowing me to use the SD card as a key of sorts.
Here is an example of what menu looks like (this is not debug mode, it’s a lower level menu):
LINUX/MAC USERS: Be sure to save the file with the character encoding UTF-8 and the line ending of Windows, otherwise this won’t work! So for Ubuntu Linux in GEdit, you will need to select Windows line endings in the Save As option as it is not default.
That card will be your tool to enable and disable Debug Mode on the camera. You put the card into the camera, leave the SD card door open, and turn the camera on. The camera should transfer directly to the service menu. The menu item to enable debug mode should be the first option. Use the left/right arrow keys to toggle and press the OK button to make that setting stick. The screen should go black, just turn off the camera and take the SD card out. Put in your second SD card and turn on the camera, and you should see “debug mode” displayed on the screen for a few seconds.
– SD Card 2: This is the card you will use to record images to.
Now that the camera is in debug mode:
Press the Menu button, move to the SETUP screen to the right of the primary screen. Press the up arrow once which will move you to the bottom of the list, otherwise you can scroll down until you hit the bottom and press once more to get into the testing section. This is where the debug mode auto focus testing menu item are located.
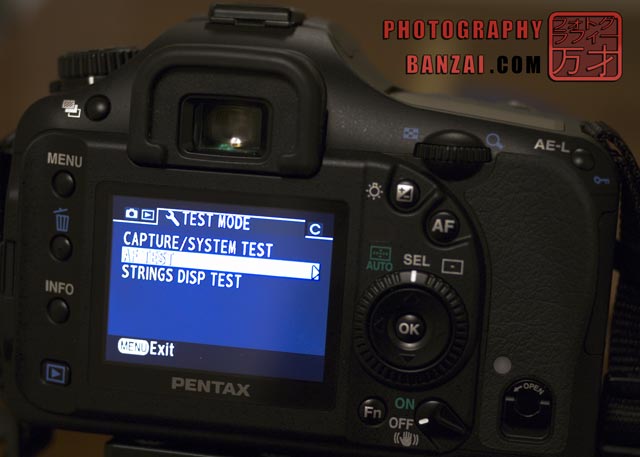
Select the AF TEST item and you will see this screen below:
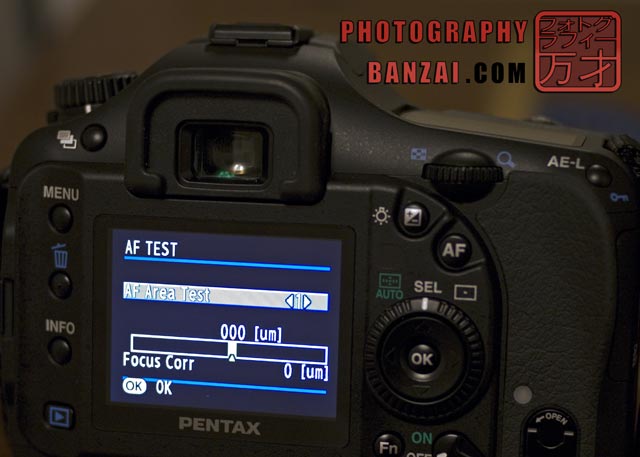
Let us analyze that screen for a moment. The first setting “AF Area Test” is the type of test from 0 – 3, where 0 is most likely not used and the other three specify both, horizontal, and vertical tests. From the reference material above, the method to try first is 1, as it will test on both horizontal and vertical planes. At this point I’m not really sure of the best method to try, but considering the value can easily be returned to zero, it’s as simple as trying something until it works as desired.
How I tried to dial in my compensation setting:
Seeing as this setting is a universal correction, we will need to dial in a setting that works “good enough” with most of the glass available. I initially started off with the D-FA 100mm WR Macro lens and tried to get that focusing perfect at f2.8, which in retrospect was probably a bad idea as I will talk about later.
Your correction accumulates. So if you go into the screen and add +40 um, exit out, return, add another +40 um… you will have a total of +80 um correction. To reverse that you add that same amount from the other direction. The 3 digit value between the input areas shows the total amount of correction happening.
Testing steps:
To make things easy, have the camera in center point focus mode pointing at a specific object on your ruler or test sheet. Remember exactly where the AF point is.
– Take a photo as reference for 0 correction.
– Make sure you on setting “1” for the test mode.
– Move a set amount of um (micrometers), say +40 um, and press OK to exit out of the menu. Take a photo.
– Return to the AF adjustment screen and add another +40um in the same direction you did last time. Take a photo.
– Return and subtract by adding -120 um, which will mean you are now at -40 um. Take a photo
– Return once more and do another -40 um, for a total of -80 um. Take a photo.
Take those 5 images back to the computer and analyze them.
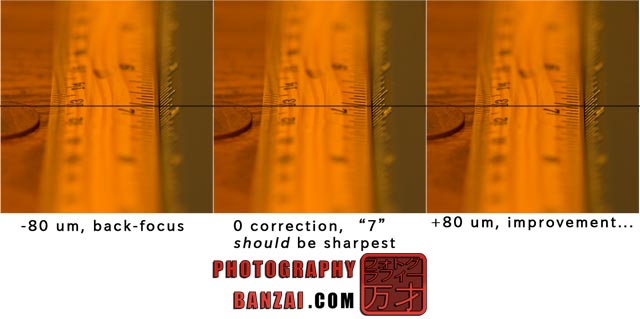
If the +XX um photos look more correct you body was back focusing, if your photos look more correct with -XX um, then it was front-focusing. Figure out which direction you need to go to get spot-on focus. Repeat the steps until you get that lens focusing as desired. If you were jumping 40 um at a time, start testing at 10 um once you find a range where you believe the best amount of correction exists.
I did this test on my D-FA 100mm WR Macro using f2.8 around 1.5 ft from the subject. I eventually narrowed down the correction to +220 um, the problem there is that once I tried most of my other lenses they were now front-focusing. I decided to split the correction in half and try another method.
My second method:
Using 4 different lenses I tested each lens at +220 um. Most of them were front focusing. So I subtracted 120 um giving me a total value of +120 um. Most of the lenses faired better with that correction. I kept narrowing down the value until settling on +150 um.. While I feel there is still some testing to go, I think this value will be pretty decent with all of my lenses in real world conditions, especially compared to the pretty severe back-focusing that was happening without any correction.
Once you find a decent amount of correction, you should turn off debug mode.
– Turn off the camera.
– Insert the first SD card with that text file back into the camera, leave the SD card door open.
– Turn on the camera and you should be forwarded to the special menu. Turn debug mode off just as you had turned it on, press the OK button on that item after toggling it to make sure it sets. The screen should go black.
– Turn the camera off, put your other SD card back into the camera.
– Take a few more test shots to make certain your correction is correct.
As the people across the pond would say “Bob’s your uncle!,” that should be all to what is necessary in improving the accuracy of your auto-focus on the K10D with firmware v1.31. Happy shooting!

