
Today we’re looking at my Canon EOS M50 b-roll settings. Basically, any situation where I’m going to do stationary video clips. These settings seem to be the best so far given the M50’s limited configure-ability. To do vlogging or more active styles of videography, only a few changes would need to happen such as enabling image stabilization. The camera is adjusted so that I can quickly switch to hand-held work as well. The goal here is to make videography easier and faster to manage as a solo content creator.
If you are interested in the M50, here are my affiliate links to it and a metal video rigging cage that I often use with the camera.
Canon EOS M50:
https://bhpho.to/2GfvdKK
https://amzn.to/2Rd7fIx
SmallRig 2168 Cage for Canon EOS M50:
https://bhpho.to/2GnsNto
https://amzn.to/2RbneXq
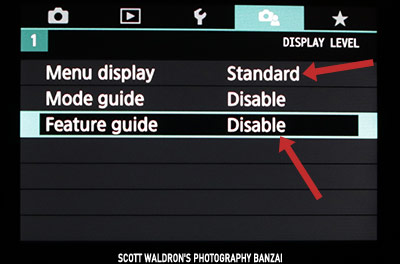
The first step with the M50 is to turn off the easy mode guided menu system. This allows you to access more features and settings in the camera. I always have the cameras in the standard menu.
The next step, in my case, is to put the camera into video mode. Change the main physical mode dial to the video setting. While you can record videos in the standard PSAM photo modes, I prefer to use the dedicated video setting.
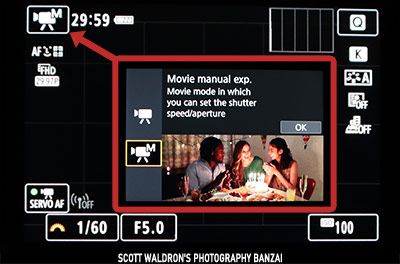
Once in video mode, I go into full manual exposure triangle control. You can press that icon at the top to go from a program mode to manual. I find it easier overall to control exposure rather than let the camera adjust shutter and aperture. In manual mode you can let the camera control ISO, which works alright if you want one less setting to deal with. Use that in addition to exposure compensation.
In the quick menu, you can adjust the autofocus mode, the video resolution with frames per second, color temperature, and picture profile.
Before we go into settings I wanted to talk a little about videography best practices (as far as I understand them at least). There is a difference between your recording frame rate and your shutter speed. Recording rates on the M50 are generally from 24 to 60 frames per second (FPS). Think about what you want to do with your video to decide on how many FPS you want to record. 24 is more like movies and 30/60 are more like TV, but there is more to it than that.
Shutter speed will control how movement looks in your video. For each frame that is recorded, your shutter speed will give you more or less blur when someone moves or the camera is panned. The simplest way to get a decent result is to use a shutter speed approximately double what FPS you are recording at. If you record at 29.97 fps, set your shutter speed to 1/60th of a second (the closest a normal camera can get to). That will give you fluid movement for that recording format.
Aperture will control your depth of field and how much light gets to the sensor. Large apertures tend to have a pleasing look and help to give visual priority to the person or object in focus. You can use small apertures to help deal with bright light or get more in focus. Often I use small apertures outdoors so that I can keep my shutter speed at double my recording frame-rate, while sacrificing some of the look.
If you are trying to film in broad daylight or some other situation where doubling your frame-rate isn’t enough and you want larger apertures… or even small apertures are not enough, you will want to look into neutral density (ND) filters for your lenses. They are basically sunglasses for your lens so that less light gets to the sensor. That topic isn’t really part of this article, so I’ll leave it at that.
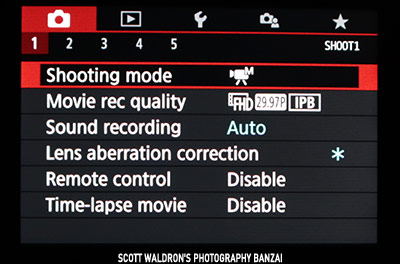
In video mode you can adjust the “shooting mode” there instead of using the quick menu mentioned before. Use whatever works. Also, on this page you can adjust what recording format you want and the sound settings. With these b-roll style videos most of the time audio isn’t important. So I’ll leave it on auto. I disable the lens aberration corrections, though I’m not sure if they apply to video or not (maybe that’s something to experiment with).

If you decide to use auto ISO, this tab (or the Q menu) is where you will want to adjust the boundaries of that. I usually let it max out at 6400, but that will result in some pretty grainy footage with the M50. It’s up to you. I have the “Auto Lighting Optimizer” setting disabled. I don’t want the camera adjusting things to produce an odd HDR look to the footage while messing with settings.
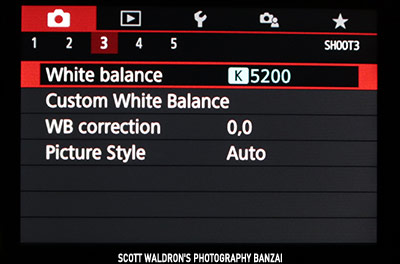
White balance will depend on your environment, but I often leave my camera on 5200K. It’s a decent balance for daylight. The lights I use are set to 5200K as well. So if I’m recording one of my hands-on gear videos at my local camera shop, my LED light will be on that setting because it acts as the key. Not ideal considering their overhead lighting that’s much more orange, but often I’m getting daylight through the store windows (no so much in the winter…). For picture style I’ll often use Auto or the Faithful setting. I’m not a professional video colorist, so definitely something I should work on more.
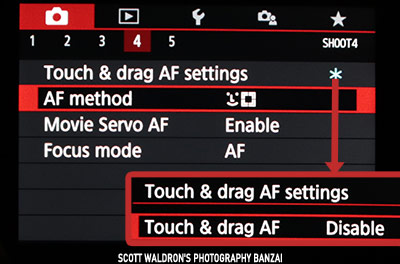
This setup focuses on the back screen, so Touch & Drag settings are not needed here. If you are unfamiliar with that feature it’s basically a way to move the focus point when the camera is up to your face. It only works with the viewfinder active.
For the AF method, it’s a mixture of the automatic focus selection, zone AF, and single point AF. Most of the time I have the camera in automatic mode. I’ll tap to focus where I need to if I’m behind the camera or in front with the screen facing me.
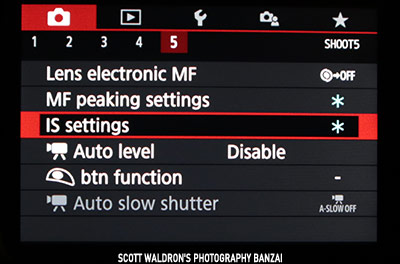
I have peaking enabled (MF peaking settings) for situations where I’m using manual focus. For IS settings it will depend on what I’m doing. If I’m using the camera on a tripod I try to remember to disable image stabilization. It can make the first few seconds of the clip wobbly. I disable the auto level feature and the auto slow shutter feature. Both of those will add potential issues to the footage based on whatever the camera wants to do. The Auto level feature will crop in and the auto slow shutter will mess with the shutter speed. I could see using the auto level feature for vlogging or hand-held behind the camera outdoors work.

For the 3rd tab in the M50 I modify a few settings. I disable the wireless features on the first page because I don’t use them and it could be wasting some battery power. There are other various settings like how long the camera will stay on without a button press. Adjust things here how you would like.
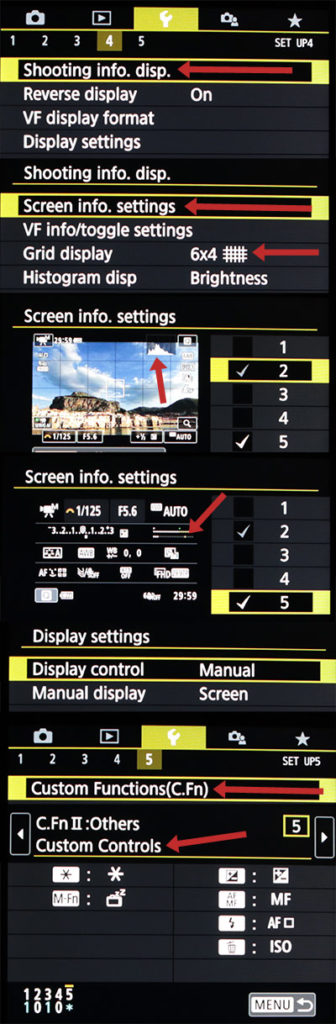
On tab 3 page 4, in the “shooting info display” setting there is “screen info settings”. In there I have two pages set up. One has a small histogram enabled. The other one is the textual screen where the M50 shows audio levels. While I mentioned not doing audio much with this type of videography, I usually leave this set for when I do vlogging (to make sure my microphone is working).
A key setting here is “display settings” on page 4. I have it set to only use the back screen. Otherwise the camera will use the eye sensor. Toggling to the EVF often by accident. When I’m doing this type of filming and often handling the camera, I just want the LCD screen.
On page 5 is where the buttons are adjusted through the C.Fn II: Others area. Below are the custom controls. Some of them are default and others are assigned to what I think works well for this type of videography.
- Asterisk button = AE lock.
- M.Fn button = Display off
- +- button = default
- AF/MF button = default
- flash button = AF method
- trash button = ISO speed
The most important button changes are the flash button and the trash button.
With AF method you can press that button and it cycles through the auto/zone/single AF settings. It’s a fast and convenient way to change that setting and it would only work with that button or the AF/MF button due to pressing it once to pop-up the setting and then pressing it more to cycling between the three options.
With the trash button applied to ISO, you can press it to show the setting on the screen and then use the left/right button on the d-pad to change the setting. It’s easier than other ways to adjust ISO on the M50. It’s especially true when in harsh conditions where touch screens are difficult to use.

The last tab on the M50 is dedicated to a feature called “MY MENU”. I would have much preferred something like custom save slots in the camera, but this is better than nothing. In this case I have a single page of settings related to filming b-roll and switching to hand-held work.
- Movie recording quality
- IS settings (if I switch to vlogging or hand-held b-roll)
- Sound recording (if I switch to vlogging or hand-held b-roll)
- White balance
- Picture style
- ISO speed settings
The one benefit of the “my menu” feature is that if I leave the camera on that menu screen, it will return to it if I close and then re-open the menu. That speeds things up a bit. So these items I might want to change when I’m going from tripod to hand-held won’t require me to remember which tab and page a given menu item is on. It’s also convenient if I want to do some slow motion work at 60 fps.
That’s pretty much it for my b-roll and related filming settings. There was a lot here that I glossed over a bit due to the amount of information and setting pages involved. The general idea is to have the camera work consistently for tripod video while allowing me to quickly adjust a few settings for hand-held filming.
If you are interested in the M50, here are my affiliate links to it and a video cage that I often use with the camera.
Canon EOS M50:
https://bhpho.to/2GfvdKK
https://amzn.to/2Rd7fIx
SmallRig 2168 Cage for Canon EOS M50:
https://bhpho.to/2GnsNto
https://amzn.to/2RbneXq