
After making a recent video, it seemed like a good opportunity to detail the process I do when making YouTube thumbnail images. People tend to judge a book by its cover, so it’s a good idea to put your best effort into making that video “cover” look nice.
When I’m out recording for a video I try to take photos that might work as a thumbnail image. If it’s a gear related video, I’ll do a self portrait with the piece of equipment. They don’t always work out, but it’s good to have potential source material.

This works because I usually have two cameras and a tripod or two with me to produce the video itself. Usually the video camera will have a wide angle lens. That’s the one I use for the photos.
Besides simply pressing the shutter button, there are a few other methods depending on the look you want. It also depends on the capabilities of your camera.
In the case of the Canon EOS M50 you can use a 10 second timer, 2 second timer, or the wireless phone app called “Canon Camera Connect“. The app offers full control of the camera through the phone, which works great for remote work.
At least for this example, I just pressed the shutter without doing anything special. It’s easy to do with an ultra wide angle lens like the 11-22mm. The intent was to crop the best photo afterward.
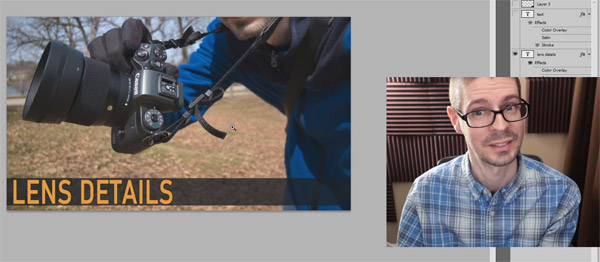
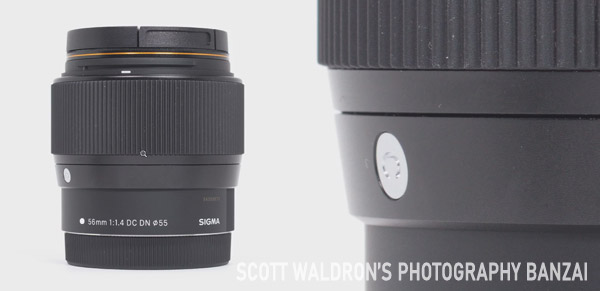
While just the single photo is alright, I wanted to add more to the image by having a layer overlay with the lens on the right side of the thumbnail. I could source one of the images from the manufacturer, but it’s nearly as easy to take a photo myself and I can make something that fits better.
To do that I use a little table area that’s normally used for b-roll video. I have dedicated lights set up there and white card-stock paper. The paper I have is the usual 8.5×11 inch paper that’s designed to be used with laser printers (Look for cardstock paper on Walmart). Nothing special, but it works a bit better than normal thin printer paper. You could always tape the pieces together to make it stronger.
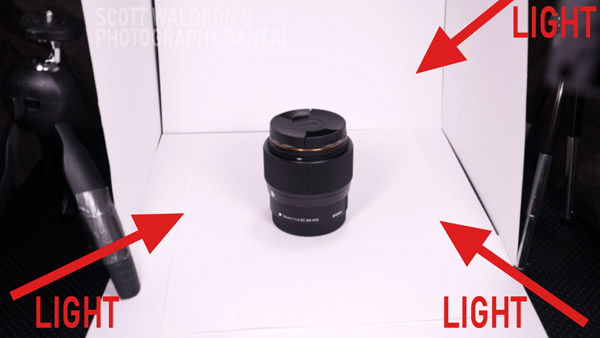
To take the photo I was using the Canon EOS M5 with an adapted EF 50mm f1.8 lens plus the standard adapter. For a photo like this I want the image to look pretty flat, so a longer focal length is good.

When isolating a subject on white you want an exposure that nearly blows out the white areas surrounding the image, if possible. That will make it easier to remove the background later on.
When photographing something close up like this you will want to use a smaller aperture so that you can get more of the subject in focus. It also helps the edges of the lens in this case to be more defined with less color fringing.
With an image like that it’s pretty easy to remove the background well enough that the edges won’t be noticeable at thumbnail image size. I still use my old copy of Photoshop CS5.1 for graphic design purposes. It works well enough. You can apply this to other options like Gimp.
One method of preparing the image to be an overlay:
- Right-click on the background and select “Layer from background…” This allows us to remove the white area around the lens to get transparency.
- Change to the “Quick Selection Tool (W)” in the main toolbar. This allows for making selections with a decent level of control. Read up on how the tool works. It’s possible to add and remove from the selection so that you can fine tune things.
- You can adjust the brush size with ALT + Hold Right Mouse Button.
- Once you have a selection of the white area of the image, use the DEL key to delete that selection from the layer.
- Deselect and then select around the lens. It should be ready to paste or drag into your thumbnail project file.
With the lens isolated by transparency, you can now copy that to your thumbnail image. The edges of the lens won’t be perfectly clean, so I tend to add a layer style (double click on the layer to bring up that window). I add an “outer glow” of white to smooth out the edges.
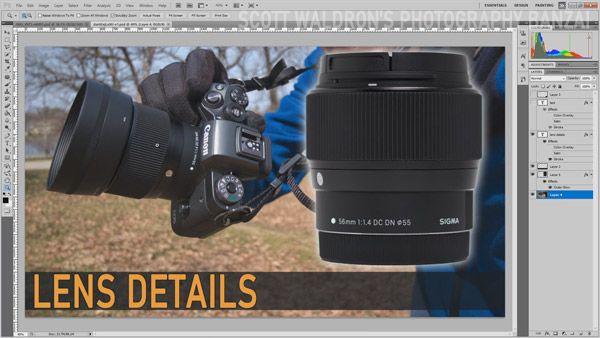
I skimmed over the process a bit, but you should get the idea. The goal is to make something that could help a potential viewer figure out if the video is something that they can benefit from watching.