
I’m down to around 800GB on my two main 10 TB external hard drives besides all of the other miscellaneous drives I’ve collected over the years. That’s a combination of photos and video projects I’ve saved over the years. For the two large drives, I mirror the data by hand. It’s fine, but I want to improve the situation.
The video projects are taking up the majority of the space. Even when I record mostly in 1080p, it still adds up fast. A single project can range from 15 to 50 gigabytes.
Why save most of the footage and photos?
- I often reference past work. There are many videos where I pull a clip of some camera I owned at one point or something I had hands-on time with.
- I can even go back and reference the footage to see some feature of a piece of gear I looked at in a hands-on video. My YouTube channel isn’t huge, but I get a fair amount of questions through comments and Instagram/twitter messages.
- Sometimes I might upload videos to Amazon Prime Video Direct, which requires a specific format or adjustment, so I can’t use the original render. There is also the possibility of a new service showing up that’s worthwhile to upload to.
- In the process of uploading to a new platform, I sometimes revise videos. So the content can be improved over time.
- I really wish I had saved footage and project files from the entire YouTube channel’s lifetime. It wasn’t feasible due to the cost, though now isn’t that much different.
- It’s difficult to separate the used content from the data that’s not used in a project. Sometimes the stuff that doesn’t get used turns out to be helpful in a future project. There is probably a lot of fluff in projects but the time spent weeding it out often isn’t worth it.
Data storage is expensive, especially when you factor in having at least two backups. Even though I’m spending a considerable amount for this upgrade, it still feels like a bare minimum upgrade.
My data expansion will consist of this:
- Two new 10 TB hard drives that will work in combination with the two existing 10 TB hard drives.
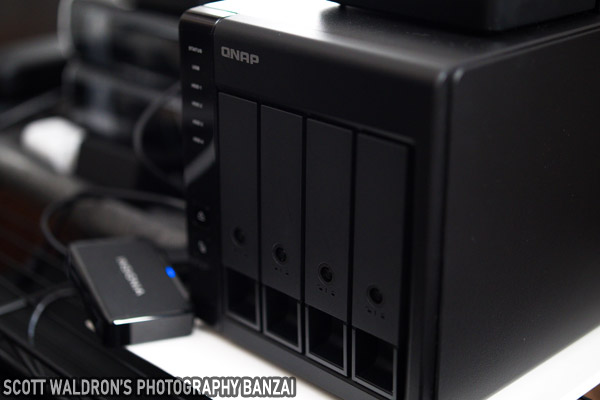
- A QNAP TR-004 DAS device. It has 4 drive bays. This supports RAID 5 and 10, but is a direct connection device rather than a NAS. There is software for configuration, or dip switches to set the RAID level.
- One 16 TB external hard drive that will stay as-is for now. This will be the main second backup until I run out of space. The price per gigabyte for that drive isn’t amazing right now, but I wanted the largest size possible in a single drive. This is my potential next step after I run out of space with the set of 10TB drives. Maybe by then 16TB drives will be lower cost. Though, I’d prefer 20TB drives as a next step. I know they exist, but they are not sold in the retail market.
Check out the some of the equipment mentioned (my affiliate links):
- QNAP TR-004: B&H, Amazon, Walmart, and eBay
- Seagate 16 TB external drive on B&H
- WD 10TB drive: Best Buy, B&H, Walmart, Amazon, and eBay
Hard drives are marketed and sold in an odd fashion. Bare drives cost significantly more than external drives. Some of the price reflects in better warranties on bare drives. I’m not concerned with the warranty, so I’m going with externals that I can “shuck” to save money. I don’t like using the warranty on storage devices once I put personal data on it. I also don’t sell my old storage devices (yep, I destroy the disks and recycle the metal bits).
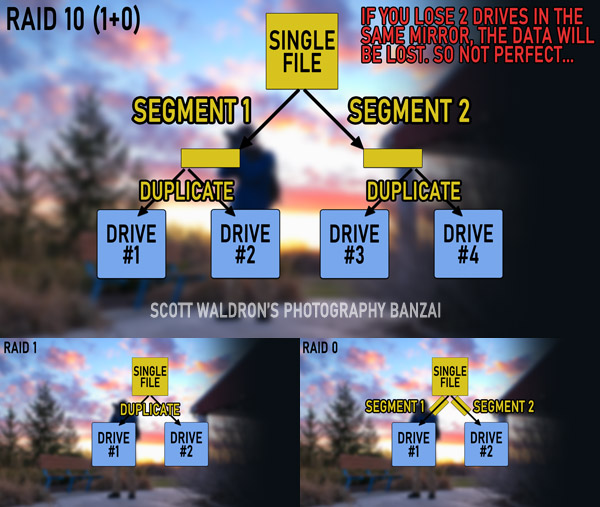
While the QNAP supports RAID 5, I decided to go with RAID 10. At least for the moment I’m more concerned with speed and duplication rather than total capacity. Any time spent waiting for a transfer is time I could use doing or monitoring something else.
RAID 10 is a combination of RAID 1 and 0. With RAID 0, imagine a single file being broken up into pieces and split up equally between two disk drives. In theory, you should be able to read and write data twice as fast. The reality isn’t quite that perfect, but you do usually get a performance benefit. The drawback is that if one drive fails then you lose everything. Having the information split up is called striping.
With RAID 1 it’s simple mirroring of data. So with two drives if one fails you have a complete copy on the second one. Performance might be slightly less than directly accessing a single drive, but it shouldn’t be noticeable. The drawback is that you only get half of your total capacity. If you do a RAID 1 setup on four drives you will get the capacity of a single drive. This is fine, but remember that one human error taints your backup! I think it’s better to have a secondary backup device rather than one big device with multiple mirrors.
RAID 10, also called RAID 1+0, is a combination of those two types. You need at least four disks to make it work. In the case of that many drives you will have two mirrored pairs that are striped.
In the case of RAID 5 you’d get the capacity of 3/4 drives compared to half with RAID 10. This will get me 19.2 gigabytes of usable total storage.
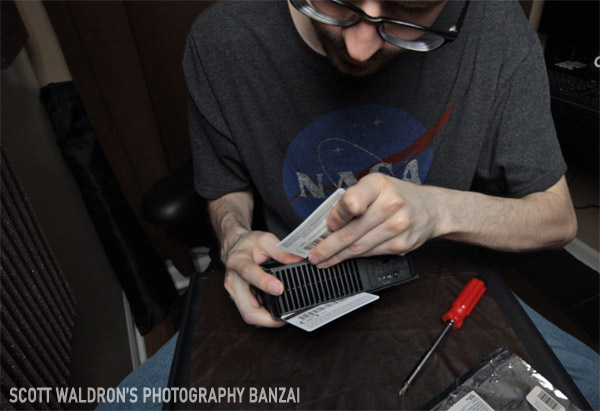
Before shucking the new disk drives I wanted to make sure they functioned. I decided to use a program called “badblocks” that works in Linux. I’ve used that OS many times over the years, but I don’t currently have a PC with it on there. It’s not a problem because you can pretty easily make a bootable USB drive that can run in a demo “live disk” mode.
If you want to do this, have a computer available that can run continuously for a few days. Attach your external hard drives to fast USB ports and prepare the USB drive. Also figure out how to get your PC to select a USB drive as the first boot device.
Ubuntu is the distribution I’ve used the most. It tends to be pretty compatible and user friendly. They have a guide for setting up the USB drive. You need a copy of the install ISO image and the Rufus drive creator program.
- Start here: https://ubuntu.com/tutorials/tutorial-create-a-usb-stick-on-windows#2-requirements
- Get an ISO here: https://ubuntu.com/download/desktop
We can use this without installing anything on the computer. It will prompt you after booting up if you want to try out the OS or install it. In this case we just need to try it.
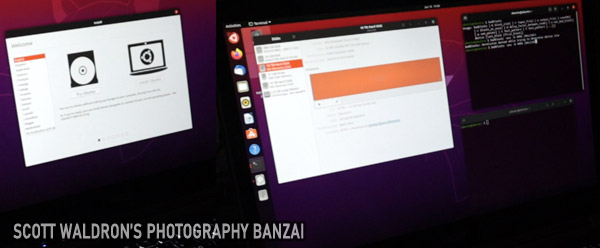
The two applications in Ubuntu to use are the “disks” utility and the “terminal”. You can click the main desktop start button (top left) to get a search box where you can type in “disks” and “terminal”. That will bring up the application icons to click on.
With the disks utility application we verify that the hard drives are attached and functioning. Also make sure they are not mounted. Take note of the path name to each disk. Normally it will be something like “/dev/sda1” or “/dev/sde1”.
You want to pull up a terminal window for each drive. the command I went with is pretty simple.
TAKE NOTE THAT YOU SHOULD NOT USE THIS PROGRAM ON A DRIVE WITH IMPORTANT DATA ON IT. THIS PROGRAM IN WRITE MODE WILL DESTROY THE DATA…
badblocks -wvs -b 4096 /dev/sd*1
The command I used.
Read up on the badblocks program to understand what’s going on with this command. The one I’m using basically means verbose write-mode that shows progress with a block size of 4096. The “/dev/sd*1” part should be replaced with the path of a drive you want to test. By default this command will do 4 passes on the drive.
I ended up doing only around 1.5 passes. Even that took 28 hours on the 10TB drives. The laptop I was using has a single USB 3 port so I was also using a powered USB 3 hub, which might have slowed things down a bit. Mut my times seem pretty consistent with what I’ve seen on the Data Hoarders Subreddit.
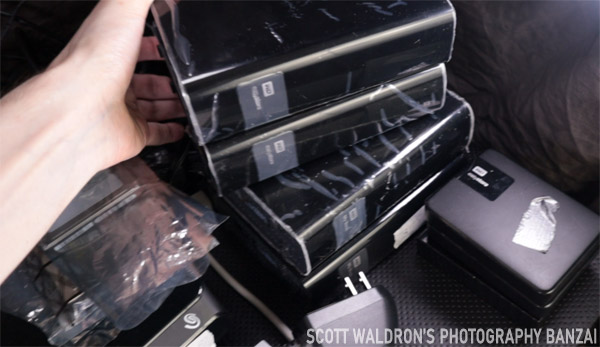
After the testing, I backed up the original ~8.5 TB of data to the new 16 TB drive as well as three 4 TB 2.5″ external drives I had on-hand. It’s good to have at least two backups in a data move. It means less chance of human error and less chance of mechanical failure destroying your data.
The next step was putting the four shucked 10 TB drives into the QNAP DAS. It was a simple process of taking off the plastic side rails of each drive cage, putting the drive in, adding three screws to the bottom of the cage, and re-attaching the rails. I left the DIP switches on the QNAP to the default of software based control so that I could configure and monitor through the PC.
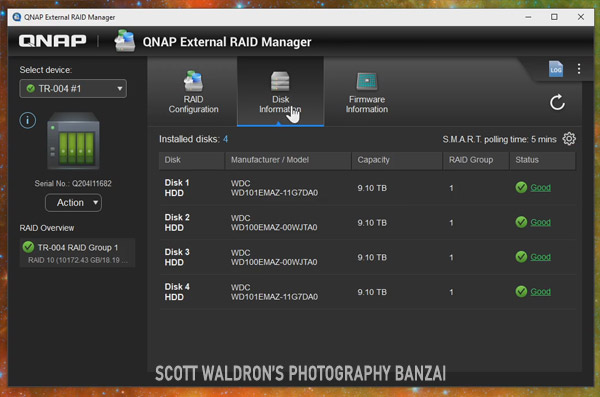
The process to setup the array through their software was simple. In the above screenshot you can see it can be actively monitored. Looking at the SMART drive details has a lot of interesting information on the status of the disks.
That’s about it! I ended up with around 7-9 TB of highly mirrored extra space on the array and new 16 TB secondary backup. The QNAP TR-004 appears to max out at a bit over 200 MB/s write speed in RAID 10 with the WD 10 TB drives. I suspect it’s the DAS and not the drives as the limiting factor. If things get really bad with storage capacity, I could switch the array to RAID 5 instead of 10. I’m going to take a guess that my write speeds would be cut in half with that mode due to the added overhead. I have enough older drives that I could backup everything temporarily for that to happen.
Hopefully by the time I need more space I can expand instead. I’d probably keep this DAS and put larger drives in it for use as a secondary backup in RAID 5 or dare I say… JBOD if I used it as a 3rd or 4th level backup.
It doesn’t sound like a lot of extra storage and probably won’t be soon enough, but it’s what I could manage right now. Just the three drives and DAS were the cost of a decent camera, computer, laptop, or tablet.
Quite a long process even though I was trying to make it as quick as possible by going with a retail read-made device. Maybe in the future I will put together a U4 rackmount or tower PC designed to hold a large number of drives using an OS like FreeNAS or Unraid. For that to be an option, my YouTube channel and related work need to grow a lot more.
Data backup is the big hidden cost of being creative in a digital world.
Check out the some of the equipment mentioned (my affiliate links):