
Before digital cameras came around, some aspects of image creation in the field were left up to chance. Now with the advent of digital cameras, you can instantly review your work to get an idea of how the image just turned out after pressing the shutter. I personally prefer to have my camera setup to not display a review image unless I tell it to by pressing the review button. So why might you ask would I want to have that useful feature disabled? When photographing people in a model to photographer sense, it’s best to review after taking a short session of images. That way you don’t interrupt the flow and connection you have made with the model. Take a few shots and then review, repeating as needed to get what you want. Reviewing after every shot will quickly make the situation awkward thereby breaking any good flow.

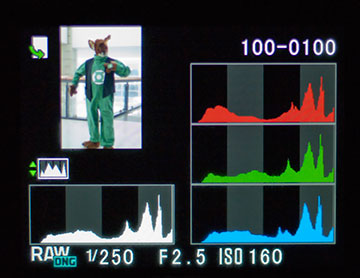
When reviewing an image, you have a few well known options that are in most cameras. The first would be an alert that you can enable which shows overly bright and dark areas of an image. In my camera’s image view settings it is simply called “Bright/Dark Area” as a check-box I can select. When selected, the camera draws red boxes over blown highlights and yellow boxes over blacked out lowlights. The second option would be to enable the histogram. It is a graph that shows the tonal (lightness) distribution of an image by plotting the number of pixels of each tonal value. Seeing part of the graph stretch out past the bounds will mean that either the image’s highlights were blown (right side of the graph) or the shadows were blacked out (left side of the graph). You can also quickly judge if the image is overall under-exposed or over-exposed by the distribution of graph data toward one of the sides. Some cameras such as mine include a second type of histogram called the color histogram, which represents the color distribution of the image in graph form. So I see four graphs consisting of red, green, blue, and white for lightness. That will allow me to make sure the image does not have a single color that is over exposed and that overall white balance is correct.
In addition to what I mentioned about using histograms and alerts to notify you that the dynamic range limits of your camera were passed, checking how your framing turned out is a good idea. In some DSLR cameras, the viewfinder does not completely display everything that will be in the image. These viewfinders are usually in cheaper DSLRs, so you just need to be mindful of your framing when using one of those. It is good to check regardless of viewfinder coverage. After taking a set of shots, examine the edges of the frames to make sure a finger, camera strap, or shadow did not accidentally show up. Even throughout the image, it is sometimes easy to miss an eyesore like a trash can or someone staring or making a funny face at you in the background (called a “photo bomb”).
- Overview
- Who is this for?
- What is convention photography?
- My experience and experiences
- Why be a part of this?
- Practice, practice, practice!
- Networking
- Fun
- Photography terms primer.
- Equipment
- It is important or not depending on your ideals
- A basic setup.
- Decide how you want to make it work.
- Framing and composition
- Full body shots.
- Portrait style.
- Skewed angles.
- Face in detail.
- Plane of focus.
- Rule of thirds and golden ratio
- Available light photography.
- Strobe photography.
- Removing harsh light.
- Flash brackets.
- Bokeh and blur maximization.
- Histogram reading and image review.
- Post processing.
- Various schools of thought.
- Available software on your OS of choice.
- Ideas on how to improve your processing.
- Business cards.
- Social networking.
- Website
- The process from start to finish.
- My equipment.
- Ask the person first.
- Interrupting people.
- Constrained areas.
- Physical activity.
- Summary